Precious Print: DIY: create a precious print with the child from 1 to 3 years old.
| Short on time? Here is the essentials ✨ |
|---|
| 🎨 Focus on the precious print (hands, feet, natural stamps) for a creative sensory, gentle, and quick activity. |
| 🧠 For the child aged 1 to 3 years, each mark strengthens motor development, curiosity, and understanding of the world. |
| 🧼 Prepare a simple and safe space, with child-friendly paint that is washable and edible-friendly, for a peaceful parent-child workshop. |
| 🌿 Use everyday materials (sponge, leaf, potato) for an eco-friendly and economical children’s craft. |
| 📚 Turn handicrafts into an educational pastime with stories, songs, and soothing rituals. |
| 🖼 Archive, gift, display: thus, the artwork becomes memory, gift, and lasting pride. 👣 |
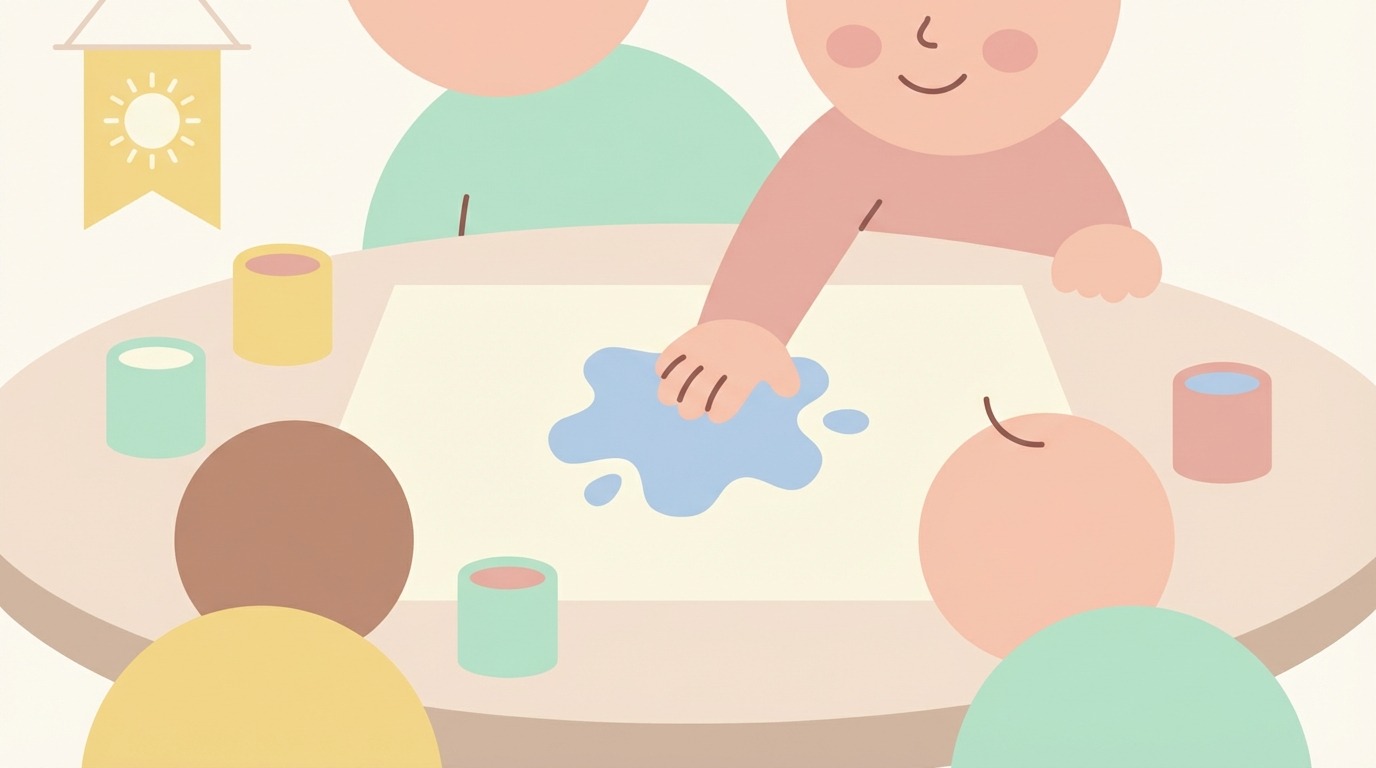
A little foot placed in the paint, a hand opening, a leaf that lights up. The precious print captures a moment and reveals the creative impulse of the toddler. For a child aged 1 to 3 years, this simple gesture triggers a whirlwind of sensations, discoveries, and emotions. Print workshops are a complete educational pastime: they nourish motor skills, stimulate language, encourage attention, and establish soothing rituals.
In families and nurseries, these moments become warm reference points. With adapted child-friendly paint, a well-protected corner, and some everyday objects, the children’s craft unfolds without stress. The marks multiply: hands, feet, leaves, sponges, corks… Each print tells a story and fits into a path of progress. The workshop is experienced as much as it is seen, and the sheet becomes a tender memory of the first steps of handicraft.
Precious print and toddlers: a springboard for motor and emotional development
The print speaks to the body. When a toddler presses their palm on the paper, they feel the texture, temperature, and resistance. This tactile engagement nourishes motor development. The hand opens, closes, orients. The fingers explore, then fine motor skills refine through short and repeated gestures. At the Lucioles nursery, for example, Mila, 2 years old, discovered contrasts by stamping yellow on blue. She looked at her fingers, then the paper, and smiled when the new color appeared.
These gestures structure space. The child learns up and down, near and far. They align, overlap, leave “holes” to breathe. This small step towards composition builds visual thinking. In a parent-child workshop, speaking softly about shapes and directions helps a lot. Saying “you place your hand on top, then bottom” guides without restricting. The mark becomes a clear, visible, and reassuring reference.
Prints that nurture language and confidence
The print invites naming. Sensations are described: “it’s cold,” “it tickles.” Colors are repeated. Characters are invented from the marks: this circle becomes a sun, these steps draw a little penguin. Speech frees up, and the story continues. The creative activity often extends into an improvised book or a song. Parents who enjoy stories can draw from traditional children’s tales. Familiar figures help the child connect the mark to a simple, already loved narration.
Confidence also grows. Showing their sheet, receiving a smile and a compliment—that’s a small victory. Noah, 3 years old, sometimes refuses the brush. Yet, he accepts the foam roller. He applies gently, sees the clear mark, and feels capable. This success makes him open to other attempts. The children’s craft thus builds steps of self-esteem, solid and joyful.
From gesture to soothing: ritualizing the precious print
Rituals matter. Turning on a small light, putting on an apron, presenting the sheet, singing a little tune. The body understands that it’s time to create. In sensitive periods, a few extra cues reassure. Some parents share that art helps them breathe through busy phases, such as the organization of prenatal exams. The workshop becomes a gentle pause where everyone regains their breath and recenters together.
In the end, the print is not just a simple pattern. It’s proof of presence and progress. On the paper, you see growth. In the heart, you feel the bond. This is the first secret of the precious print: a humble mark that lights the way.

Safe materials and calm preparation: succeeding in a parent-child workshop at home
Success begins with preparation. A protected space reassures adults and frees the child. Setting up an oilcloth, taping kraft paper to the floor, taking out two towels and a basin of warm water simplifies everything. Choosing a child-friendly paint that is washable and non-toxic prevents tensions. Edible-friendly brands, made from simple ingredients, remain ideal for the child aged 1 to 3 years.
A short time is better than a too long session. Fifteen focused minutes often suffice. It’s better to stop on an enthusiastic note than to continue until fatigue. This pace protects motivation. Regular rituals reinforce inner security; some ideas inspired by rituals and habits support coherence over the weeks.
The essential print kit: simple, economical, and effective
- 🖌️ Washable paints and large brushes, foam rollers
- 🧽 Sponges, cork stoppers, potatoes cut into shapes
- 🧻 Thick A3/A4 paper, masking tape, aprons
- 🩹 Washable wipes, basin of warm water, mild soap
- 🌿 Leaves, herbs, dry bark for natural stamps
- 🛎️ A bell or song to announce start/end of the workshop
This material is often found at home or in stationery stores. Costs remain modest. Natural objects invite going out to the park before the workshop. The walk prepares the senses and puts joy in the gathering. This preamble already transforms the activity into a complete educational pastime.
Stress management also counts. Creating with a baby at home, sometimes during breastfeeding of a younger sibling, requires patience. Practical resources on how to manage stress during breastfeeding can help families maintain a calm atmosphere. A calm parent sets the tone for play. The child then feels free to try.
Mobility and memories: print here… and elsewhere
A mini travel kit fits in a bag: A5 notebook, mini solid gouaches, damp sponge. On a train or at grandparents’, this simplicity saves an afternoon’s end. Tips for traveling with children inspire ideas for organization and active breaks. A ten-minute stop for a print, then on the way again. The journey becomes gentler.
After the workshop, comes memory. Photographing the steps and sorting the pictures creates a visual thread. Ethical safeguards remain important; the goal is family transmission. Tips to capture the first memories in photos allow immortalizing progress without interrupting the creative flow. A few shots are enough to tell the story of the day’s sheet.
When the framework is clear, the creative activity flows naturally. Preparation becomes invisible and pleasure stays central. The precious arrives naturally: a mark, a smile, and shared pride.
Printing techniques adapted to 1–3 year olds: child-friendly paint, natural stamps, and monotypes
Print techniques vary endlessly. The goal: offer simple, repeated, and successful gestures. The child experiments, decides, compares. Starting with hands and feet, then adding objects. Each variation strengthens fine motor skills and curiosity. The children’s craft becomes a series of small discoveries that add up.
Hand and foot prints: the safe bet
Spread paint with a roller on a plate. Gently place the hand like a star. Press, then lift. Counting “1-2-3” helps coordinate. For feet, sit down and guide the heel first to avoid excessive tickling. The print can be turned into an animal or flower. Names chosen by the child enrich the narrative, and the piece gains meaning.
Useful tip: keep a damp towel ready and a basin of warm water nearby. Quick cleaning avoids frustration. Offer a maximum of two colors to start. Then add contrast. This progression supports the child aged 1 to 3 years without overwhelming them with options.
Everyday stamps: sponges, corks, and potatoes
Cut a sponge into triangle and circle shapes. Dip, then stamp on the paper. Alternating shapes creates a visual rhythm. Corks draw bubbles or caterpillars. A potato carved with a heart or star makes an impression. You can propose a “stamp dance”: three triangle taps, one circle, pause, then repeat. Regularity builds attention.
Introducing a tree leaf as a natural stamp offers a beautiful effect. The vein prints a fine texture. This discovery often amazes. The child looks closely, runs a finger over the mark, then repeats. We then talk about the “underside of the leaf,” naming the season. The connection with nature is established through the hand.
Monotype without plate and zip bag: the magical print
Spread a bit of paint on a plastic sleeve. Draw with a finger. Place the paper on top, smooth, then peel off. Surprise appearance! This “homemade monotype” produces a cloudy effect. It appeals to children who like soft effects. Practical variant: paint enclosed in a zip bag. You press with the palm and fingers without getting dirty. The sensory effect stays present, and safety is maximal.
These accessible and varied techniques combine exploration and success. The mark renews without complicating. Through attempts, the hand adjusts and the gaze sharpens. The precious print gains in beauty and intention.
Thematic projects to tell stories: seasons, emotions, and tales for a lively educational pastime
Thematizing without rigidity adds depth. A seasonal cycle, for example, structures four successive workshops. In spring, prints of tender leaves. In summer, sponge flower stamps. In autumn, rubbing dry leaves with solid pastels. In winter, “frost” monotype in blue and white. The child observes nature, then translates it into marks. This loop strengthens time comprehension.
Emotions are worked on delicately. Making a small “mood wheel” printed with round stamps helps naming. Yellow for joy, blue for calm, red for anger, green for pride. The child chooses a color and stamps a circle on a card. A simple face is glued on top. Here is a tool to talk, express oneself, and soothe. This kind of creative activity strengthens expression and prepares for living together.
Tales and prints: weaving stories with marks
What if a hand became the paw of Little Red Riding Hood? Or a foot, the sail of a boat? Content from traditional tales offers familiar, reassuring supports. We tell stories, print, stick on two eyes. The story unfolds in three images, no more. The child follows, anticipates, and enjoys. The mark embodies the story, and listening improves.
Building blocks also act as stamps. A textured face, some paint, and here’s a wall, a path, a fur. Drawing inspiration from parent-child creativity ideas with LEGOs opens simple paths. The important thing: keep the gesture short, clear, repeatable. Success lies in simplicity and mastered repetition.
Ready-to-go mini-examples
“Spring rain”: blue monotype background, light round stamps, cotton clouds glued. “Bubble fish”: hand turned into a fish, cork bubbles, seaweed with leaf prints. “Path of steps”: finger prints in a single file, then a nursery rhyme. Each project mobilizes handicraft, language, and a touch of math (counting, sorting, ordering). The workshop remains short, the joy great.
Families on the move or in transition appreciate these formats. When a new baby arrives, planning moments dedicated to older siblings reassures. One can rely on a prenatal calendar to anticipate creative breaks between appointments. Art becomes a gentle safety net, at home and elsewhere.
With these projects, the mark tells a story that goes beyond the sheet. It links hand, heart, and imagination. The educational pastime thus takes on its full human dimension.
Preserve, gift, and display: bringing the precious print to life every day
After excitement comes valorization. Dry flat, stick the date on the back, note a word spoken by the child. This simple archiving creates reliable memory. An A3 folder holds large sheets. Transparent sleeves protect from moisture. A monthly selection is displayed on a string with wooden clips. The work becomes a daily message: “you created.”
Gifting a triptych of hands to grandparents touches straight to the heart. Also making it a minimalist greeting card. Photographing a series for a mini album keeps track of fragile formats. With tact and sobriety, some tips for immortalizing first photo memories help capture the right light and angle. We think first about the child, their dignity, and their pleasure in seeing themselves create again.
Display at child’s eye level and sustainable workshop corner
The exhibition wall is placed at the eye level of little ones. Seeing their production encourages. Changing works regularly avoids visual saturation. A project box holds works in waiting. It opens every week. The child chooses the sheets they want to show. This autonomy feeds their confidence and decision-making ability.
For families often on the road, a ready-to-go workshop bag makes life easier. It contains paper, pencils, dry stamps, and wipes. Shared ideas for traveling with children provide concrete paths for organizing these mini mobile spaces. Three tools, one clear rule, and creativity finds its place everywhere.
Also valorize the adults who accompany
Supporting toddlers towards artistic expression requires patience, listening, and a real culture of kindness. Vocations arise: workshop animation, home care, micro-nursery support. Paths to work with children without diploma offer guidelines to those wishing to train or engage gradually. Meaning is nourished in these simple, repeated gestures, serving the growth of the youngest.
Daily, a small opening and closing ritual suffices. A bell rings, a soft song rises, aprons are put away. Inspired by cues on rituals and habits, these routines stabilize the framework and soothe transitions. Thus, the precious print does not end up in a drawer: it shines, tells stories, and connects generations.
“A simple print can hold a whole childhood by the hand.”
{“@context”:”https://schema.org”,”@type”:”FAQPage”,”mainEntity”:[{“@type”:”Question”,”name”:”Quelle peinture choisir pour un enfant de 1 u00e0 3 ansu2009?”,”acceptedAnswer”:{“@type”:”Answer”,”text”:”Privilu00e9giez une peinture enfant lavable, non toxique et si possible comestible-friendly. Deux couleurs suffisent pour du00e9buter. u00c9vitez les paillettes libres u00e0 cet u00e2ge, car elles migrent sur la peau et les yeux.”}},{“@type”:”Question”,”name”:”Combien de temps dure une su00e9ance ru00e9ussieu2009?”,”acceptedAnswer”:{“@type”:”Answer”,”text”:”Entre 10 et 20 minutes. Un rituel du2019ouverture (tablier, chanson) et de clu00f4ture (lavage des mains, rangement ensemble) rend lu2019atelier court, clair et tru00e8s satisfaisant.”}},{“@type”:”Question”,”name”:”Comment limiter le bazar sans brider la cru00e9ativitu00e9u2009?”,”acceptedAnswer”:{“@type”:”Answer”,”text”:”Protu00e9gez la zone (nappe et papier kraft), pru00e9parez lu2019eau tiu00e8de et les torchons, proposez peu de matu00e9riel u00e0 la fois. La libertu00e9 su2019exprime mieux dans un cadre simple.”}},{“@type”:”Question”,”name”:”Quelles techniques sont les plus accessiblesu2009?”,”acceptedAnswer”:{“@type”:”Answer”,”text”:”Empreintes de mains/pieds, tampons du2019u00e9ponge ou de bouchon, monotype dans une pochette plastique, sac zippu00e9 sensoriel. Elles sont su00e9curisantes, rapides et tru00e8s gratifiantes.”}},{“@type”:”Question”,”name”:”Comment valoriser les u0153uvresu2009?”,”acceptedAnswer”:{“@type”:”Answer”,”text”:”Datez, photographiez, rangez dans un classeur A3, affichez au mur u00e0 hauteur du2019enfant et offrez des su00e9ries en cadeau. Pensez u00e0 faire choisir lu2019enfantu2009: la fiertu00e9 grandit avec lu2019autonomie.”}}]}Which paint should you choose for a child aged 1 to 3 years?
Prefer a washable, non-toxic child-friendly paint, and if possible edible-friendly. Two colors suffice to start. Avoid loose glitter at this age, as it can migrate onto the skin and eyes.
How long does a successful session last?
Between 10 and 20 minutes. An opening ritual (apron, song) and closing ritual (hand washing, tidying up together) make the workshop short, clear, and very satisfying.
How to limit the mess without stifling creativity?
Protect the area (oilcloth and kraft paper), prepare warm water and towels, offer little material at a time. Freedom is better expressed within a simple framework.
Which techniques are the most accessible?
Hand/foot prints, sponge or cork stamps, monotype in a plastic sleeve, sensory zip bag. They are safe, quick, and very rewarding.
How to value the artworks?
Date, photograph, store in an A3 binder, display on the wall at child’s eye level, and offer series as gifts. Think about letting the child choose: pride grows with autonomy.