
Santa Claus Sack: Crafts: Santa Claus’s sack for 3-5 year olds.
| Short on time? Here is the essentials ✨ |
|---|
| The Santa Sack stimulates fine motor skills, language, and autonomy 🎄 |
| Simple, safe, and economical materials for 3-5 year olds 🧵 |
| Short and playful steps to maintain attention ⏱️ |
| Ideal for preschool Christmas and at home 🏠 |
| Prioritize good air quality and non-toxic glues 🌿 |
In many classrooms and homes, the Santa Sack is seen as a simple, joyful, and educational project. This Christmas craft suits the enthusiasm of 3-5 year olds, while strengthening precise gestures and confidence. Children love to handle, carry, and pretend. They then appropriate a powerful symbolic object, conducive to imitation play and end-of-year rituals.
This guide offers a concrete path to succeed in a smooth creative workshop. It details the suitable materials, the progression of steps, and the organization with a group. Each section presents reasoned choices, economical alternatives, and safety tips. At every step, the child decides, assembles, and tells the story of their sack.
Beyond the Christmas decoration, this project cultivates empathy because the sack also carries handmade gifts. It becomes a pretext to give, thank, and wait. The 3-5 year olds find a space there to dream, express themselves, and cooperate. Here is a complete, festive, and adaptable children’s activity, designed for little hands and big smiles.
Santa Sack and the development of 3-5 year olds: motor skills, language, and symbolic play
Building a Santa Sack activates fundamental everyday gestures. Children cut, glue, thread ribbons, and sort shapes. Thus, fine motor skills are strengthened without heaviness, with a motivating goal. The challenge is concrete since the sack will then be used for playing and carrying small surprises.
This project also promotes eye-hand coordination. The 3-5 year olds place elements on a vertical support or on the floor. They test the pressure needed to glue. They learn to adjust a ribbon in an eyelet. These repeated actions make future handwriting and tool management smoother.
On the language level, each step is accompanied by rich dialogue. Children name materials, compare sizes, and express choices. Because meaning precedes technique, vocabulary is better fixed. Longer sentences and better descriptive precision are then observed.
Symbolic play naturally invites itself. With the sack, children embody messengers, elves, or postmen. They deliver handmade gifts to dolls or peers. This narration supports empathy and understanding of intentions. It also encourages waiting and patience, so linked to the holidays.
In a preschool Christmas context, this craft structures cooperation. Duos or small groups distribute roles. One holds the bag, another glues, a third chooses colors. Everyone finds their place and respects the shared rhythm. This simple organization reduces frustration.
A common thread makes the workshop lively. Imagine Léo, 4 years old, who loves stars. He chooses gold stickers and a blue ribbon. Inès, 5 years old, prefers pine green. She adds a discreet jingle bell. These choices become arguments. Each defends their aesthetics and learns to listen to others.
This project often ends with a mini “ceremony.” Children parade with their sack and deliver a card. They thank a referring adult or a sick friend. This moment reinforces self-esteem. Ultimately, the Santa Sack goes beyond the object: it becomes a vector of shared emotions.
Safe and eco-responsible materials for a durable Santa Sack
The choice of materials conditions engagement and safety. Textured materials stimulate touch. A soft jute bag works well. A cotton tote bag or a thick paper bag also do the job. The essential is resistance and the absence of sharp edges.
Prioritizing adapted tools limits incidents. Rounded-tip scissors, solvent-free glues, and washable markers suffice. Thick stickers avoid frustrations. Satin ribbons are easy to handle. Finally, star, snowflake, and tree templates guide gestures without stifling creativity.
Recycling integrates seamlessly into the project. Felt scraps, packaging cardboard, and buttons become real treasures. An old dish towel can become a miniature sack. Thus, the child sees the hidden value of objects. The ecological approach gains clarity, without heavy-handed morals.
A often overlooked point concerns indoor air. Glues and varnishes can release volatile compounds. It is better to aerate and choose labeled products. For a more comprehensive approach, a guide on child protection and air quality provides clear benchmarks: tips to better protect children. The benefits go beyond the workshop alone.
Respiratory health is a long-term commitment. Sources describe air’s impact on comfort and sleep. These factors matter in winter. Therefore, organizing the workspace near a window remains wise. This file highlights the right gestures: air quality and respiratory health.
A clear organization reassures children. Arranging materials by trays simplifies autonomy. Labeling bins and providing a protective mat prevents losses. A “test” corner allows experimentation. There, children try the glue or ribbon. They gain confidence before moving on to the sack.
- 🧰 Prepare three bins: decorations / tools / scraps
- 🧼 Set up washable wipes and a small sponge
- 🪟 Air out for 10 minutes before and after the workshop
- 🧴 Choose water-based, washable glues
- 🔔 Keep jingle bells for the end, under supervision
In the end, good materials save time. The child remains available to create. The adult observes, gives precise feedback, and encourages. This quality of environment is the discreet ally of success.
Before moving on to the tutorial, a short video demonstration helps visualize the gestures. A quick search suffices to find adapted step-by-step guides.
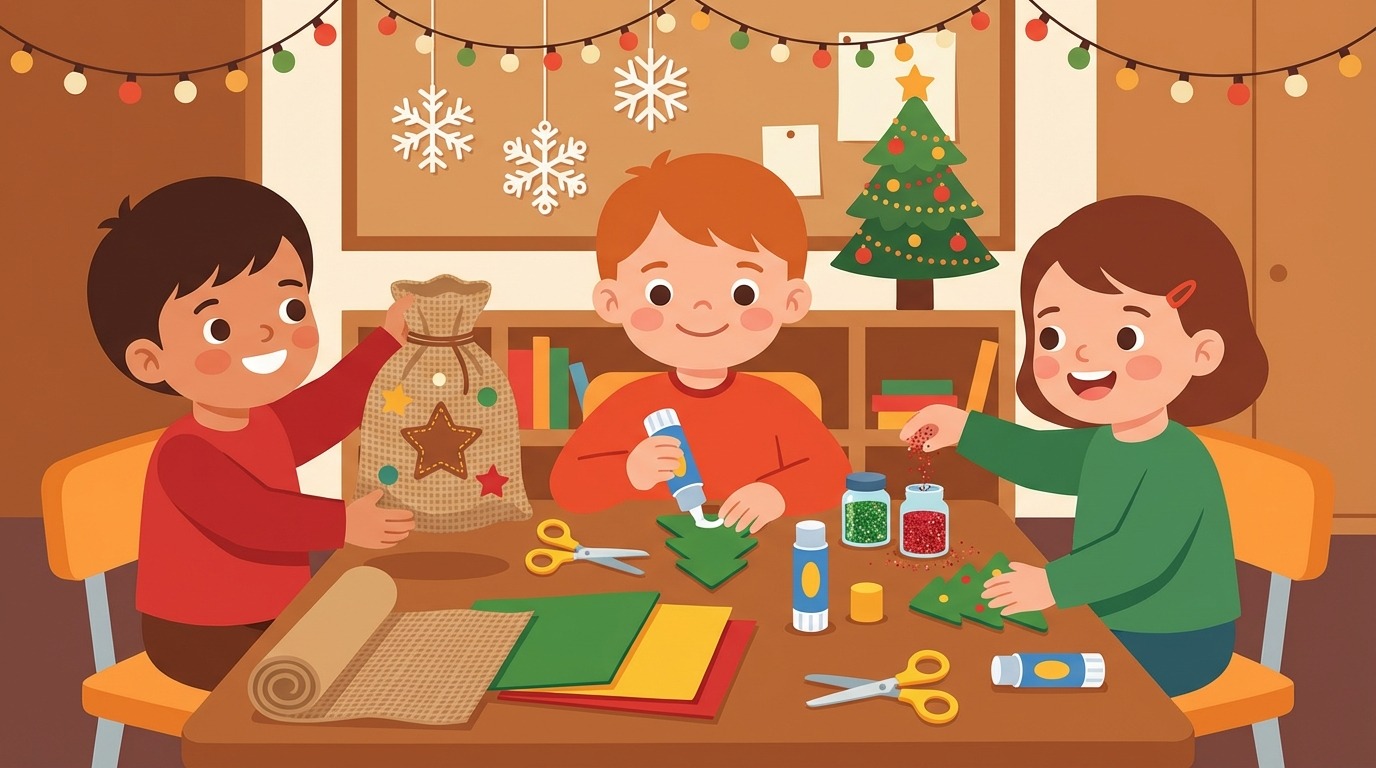
Step-by-step tutorial: making a Santa Sack with little hands
Prepare the base without stress
Start by choosing the bag. About A3 size facilitates gripping. A tote bag or reinforced paper bag suits. Children check the softness of the fabric. They compare textures and choose. This appropriation calms apprehensions and gives meaning.
Attach a name tag on the inside. An adult writes if needed. The child glues it themselves. They personalize from the start. This simple step anchors the sack in its story. It also limits unfortunate exchanges between bags.
Create the basic decoration
Offer a trio of shapes: star, snowflake, tree. Three colors suffice to avoid overload. Children position the shapes without sticking. They move, compare, then decide. The adult asks open questions: “What do you want to put in the center? Why this color?” Focus sharpens.
Move on to gluing with a water-based gel glue. Children spread glue on the edges and press gently. They count to five, then release. Patience is practiced, as well as precision. The result gains hold and pride.
Add sparkling details
Introduce glitter stickers and ribbons. The 3-5 year olds love the wow effect. Limit to three shiny items per area to keep harmony. An adult can sew on a jingle bell. Children test the sound and regulate intensity. They learn to dose the spectacular.
An ink stamp with a reindeer motif adds a wink. Children press vertically without sliding. They discover the right pressure. This gesture prepares cursive writing through controlled force transfer. Fun stays first, technique follows.
Finish the handle and the interior
Pass a wide ribbon through the handles or create a braided handle. Children choose two colors and alternate. Braiding works laterality and rhythm. The object becomes comfortable and sturdy. Inside, a cardboard sheet stiffens the bottom. Carrying handmade gifts becomes easier.
Play and verbalization
Simulate a delivery round. Children carry three light “packages.” They name the recipient and the reason for the gift. Language strengthens with storytelling. Effort regulation builds, because the sack must not fall. This action-story loop cements learning.
To summarize the educational gesture, this table condenses the essentials. It serves as a quick memo during facilitation.
| Step ✅ | Skill 🧠 | Tip 🌟 |
|---|---|---|
| Positioning without glue | Spatial perception | Use a cardboard frame |
| Gluing | Fine motor skills | Count to 5 |
| Braiding | Bilateral coordination | Two contrasting colors |
| Stamp | Controlled force | Vertical pressure |
| Delivery | Narrative language | Name, describe, thank |
This tutorial proves that a simple Christmas craft feeds several domains. The child explores, adjusts, and tells. The Santa Sack becomes the red thread linking gestures, words, and emotions.
Organizing a creative workshop in preschool Christmas: time management, safety, and inclusion
The framework makes the difference between agitation and concentration. A total time of 35 to 45 minutes suits 3-5 year olds. Break it into sequences of 8 to 10 minutes. Attention stays sharp and success sets in. A visual hourglass helps anticipate transitions.
The layout influences cooperation. Tables in groups of four children foster mutual aid. An adult circulates and verbalizes successes. Children ask for help without interrupting the group. The dynamic stays natural and calm.
Safety is planned without dramatizing. Rounded-tip scissors are shared. Glues are partially opened to limit spills. Jingle bells and glitter are offered at the end of the session. Rules are explicit and short. They are remembered by pictograms.
Air quality and hygiene complete the organization. Ventilating before and after the workshop protects the whole class. Simple gestures suffice. They are learned early and become habits. This reinforces health in the long term, beyond the holidays.
Special needs find their place. For Léo, who hates rough textures, a cotton tote bag is offered. Inès, very fast, gets the role of ambassador. She shows a step to the younger ones. Each progresses at their own pace. No one is left out.
The relationship with families values efforts. Sacks are displayed at child height. Small labels describe the skills worked on. Parents see concrete progress. They are inspired to continue at home. The school-family link is strengthened.
Unforeseen events are managed by anticipation. If a sack tears, a fabric strip serves as reinforcement. If glue stains, a “elf’s cape” is born from the stain. Turning the unexpected into creativity. The group learns to relativize and rebound.
Because winter sometimes makes indoor air more loaded, it is relevant to review benchmarks. Practical resources exist and reassure supervising adults. They shed light on prevention and good aeration practices. To go further, consult these specific elements: protecting children thanks to cleaner air.
Ultimately, a well-thought-out creative workshop makes the child an actor. They prepare the celebration seriously and humorously. This posture gives confidence and calms December excitement. Magic then combines with method.
Extending the magic: games, complementary small crafts, and Christmas decoration at home
The Santa Sack does not stop at the workshop. It continues living in the bedroom or living room. Children use it to store books, stuffed animals, or cards. Thus, the object keeps a useful function after the holidays. Durability meets emotional attachment.
Complementary small crafts enrich the universe. A kraft cardboard label, a mini reindeer made from a roll, or an “elf” badge complete the set. Each addition reinforces the sack’s identity. Children build their kit. Their creativity unfolds through successive touches.
Role-play consolidates skills. A delivery round in the house develops spatial awareness. Children memorize a simple route. They knock, announce, then deliver. The thank-you ritual installs politeness. Vocabulary grows with reasons to give.
A calendar of playful tasks maintains momentum. One day, make a card. The next, decorate a cookie. Then add a star to the sack. This gentle rhythm prevents saturation. It turns waiting into active pleasure.
Aesthetics are refined with the family. Choose three dominant colors for the Christmas decoration. They are echoed on the sack, table, and tree. Visual unity soothes the space. It highlights children’s creations. Success often depends on this coherence.
To inspire further, here are some simple ideas to slip into the sack. They remain light and suitable for 3-5 year olds.
- 🎨 Mini set of creative hobbies: three crayons, a stamp, stickers
- 📚 Short Christmas story, easy to tell aloud
- 🍪 Cookie wrapped in paper decorated by the child
- 🧩 12-piece puzzle on a winter theme
- 🧦 Warm, colorful, and funny socks
Families also watch over comfort. They ventilate during activities and store materials in closed boxes. These simple gestures extend well-being. The child keeps the desire to create and give. Magic becomes a positive routine.
Finally, for households wishing to solidify seasonal health benchmarks, a synthetic overview helps prioritize actions. This document on air quality and respiratory health fits well with family preparations. Thus, the celebration is lived serenely.
In usual conclusion, the sack opens playful doors. It encourages expression and autonomy. It aligns with simple ecological values. Here is a tradition very relevant for a preschool Christmas and warm atmosphere.
“A well-thought-out sack carries much more than gifts: it carries the pride of learning, the joy of giving, and the desire to start again.”
Quel sac choisir pour une hotte Père Noël de 3-5 ans ?
Un tote bag en coton, une toile de jute souple ou un sac papier épais conviennent. Le choix se fait sur la douceur, la solidité et la facilité de prise en main par l’enfant.
Comment éviter les débordements de colle ?
Utilisez une colle à base d’eau en stick ou gel. Proposez un tapis de protection, une zone de test et la règle de ‘petites touches, on presse, on compte jusqu’à cinq’.
Quelles décorations sont adaptées au niveau maternelle ?
Gommettes épaisses, formes en feutrine, rubans larges, tampons simples. Limitez le nombre de couleurs pour réduire la surcharge et faciliter les choix.
Comment intégrer ce projet en noël maternelle ?
Prévoyez 35 à 45 minutes, des îlots de quatre enfants, des étapes courtes et une vitrine d’expositions. Valorisez les compétences travaillées et impliquez les familles.
Peut-on utiliser des paillettes ?
Oui, avec parcimonie et en fin d’atelier. Privilégiez des alternatives biodégradables et aérez la pièce pour limiter les particules en suspension.